2012/07/20

Tips to Improve Computer Perfomance


1. Virus Scan Program – If the computer you are using doesn’t have a virus scan there are free scans available online, and one really should be installed on your computer, run automatically at a set time every week, updated regularly. Most computer problems can be prevented just by having a virus scanner installed.Tips for Improving Computer Perfomance
2. Run the Scandisk program – At least every two months you should run a program called Scandisk. Scandisk actually scans your files and even your hard drive and can let you know of any problems it discovers. Follow the steps to run Scandisk: press “Ctrl-Alt-Delete” and your close program box will appear. Highlight each item EXCEPT “explorer” and “systray”. Click on “End Task” to close the program. Then go to your start button and choose “Programs”. Choose “Accessories” at the top of the list. Move your cursor down to “System Tools” and Choose “Scandisk”.
3. Run the Defragmenter program – Another program that you should run about every two months is called Disk Defragmenter. Defrag will arrange your files better so your PC can access them faster. It’s best to run this program after the Scandisk program is finished. To run Disk Defragmenter go back to the “System Tools” and choose “Disk Defragmenter”.
4. Use a Firewall program – A personal firewall keeps viruses, hijackers and hackers from your computer. Since you are constantly connected to the internet there is a constant threat that others may try to access your computer. There are free firewall programs available for download.Tips for Improving Computer Perfomance
5. Run a Spyware program – When you download something from the internet sometimes other software is included. This software is called “spyware” and it can do many things to harm your computer, including letting someone from another website see what websites you surf in order to send you advertising. Other spyware tries to steal your passwords or other personal information. You should run a spyware checker at least once a month or at any time.
6. Run a hi-jacker search program – A hi-jacker changes your homepage to a different search engine page and can also block links to common search pages. They are trying to force you to use their homepage. Some of the hi-jacker’s homepages are not pages you would like your children to see. You should use a hi-jacker search program at least once a month or whenever you are having a problem with your homepage.
7. Clear your temporary files – Sometimes your PC’s virtual memory will become full. When this happens your computer may run slow, give you error messages or freeze during a program. This happens because everything you do on your PC – every picture on every webpage, every document you type, every photo you change – is saved somewhere on your PC, even after you have left that page and closed the document. In order to erase this memory you need to do the following steps: Open your internet browser. Go to “Tools”, “Internet Options”. A box will pop open. It should be open to the “General” tab. In the center of the box is a section marked “Temporary Internet Files”. Click on “Delete Cookies” and “Delete Files” one at a time. This will delete the temporary files that are clogging the PC’s memory.
8. Clean out old files – Periodically going through the files in My Documents or other folders you have set up and deleting or archiving them on a CD can also help your computer’s memory and performance. You can also go through the programs on your PC from the control panel and delete those you no longer use. Don’t delete any of the shared files, though, if it asks, because that can cause more problems.
9. Reboot the PC occasionally – Your PC needs to be restarted in order to reset itself after new programs or equipment is installed. It also erases the virtual memory from the last session and goes through a self-diagnostic to look for any problems. It sounds like a simple solution, but most problems can be fixed simply by restarting your PC.

2012/07/17

5 Simple Steps to Recover Deleted Photos Quickly


It can be very frustrating that we may delete or lose some photos from our computer hard drives or other storages by mistake or accidently. Here you do not need to worry any more. We will explain you to recover deleted photos in only 5 simple ways.

How to Recover Deleted Photos?

Usually, Windows computer users can recover deleted photos by following the below steps:
Deleted photo recovery step 1: Check and restore deleted photos from the Recycle Bin
After clicking “deleted” on the right-click menu of a specific photo file, it usually has been removed to the Recycle Bin. So, if when you need to recover the deleted file, the first thing need to do is to check if the deleted photos are in the Recycle Bin. If yes, we can recover the deleted photos very easily. Just right click on the deleted photos in Recycle Bin and choose “Restore”, the deleted photo will go back to its original folder immediately.
Deleted photo recovery step 2: Search in your computer hard drive
Choose “Start” > “Search”> “For Files and Folders” > “Pictures, music or video” in the search results box, type in all or part of the deleted photo name and finally click “Search”, Windows computer will complete the rest for you quickly.

But, what if the Recycle Bin has been emptied? What if the photos cannot be found in hard drive?

Do not worry. There are lots of data recovery software in the market now. Here we recommend a best and easy-to-use recovery software Acebyte Utilities which supports Windows 7/Vista/XP.

Acebyte Utilities Offers an Easy and Safe Way. Why Not Have a Try?

Acebyte Utilities Undelete utility is a simple and effective deleted photos recovery tool for all Windows OS. Any one can use it to recover deleted photos in just few clicks.

Main features in this data recovery software:
* Support file systems: FAT, FAT32, NTFS, NTFS5 , NTFS + EFS
* Quickly recover all files including those emptied from the Recycle Bin
* Powerfully recover all kinds of files such as documents, photos, videos, music as well as email, etc.
* Undelete files on removable devices including SmartMedia, Secure Digital, MemoryStick, USB Thumb Drives, Camera Media Cards, Floppy Disks and other storage devices
* Filter by file name, file date, size, file pat
*Execute batch file recovery
* Simple and user friendly interface
* Support all Windows operating systems such as Windows XP, Windows Vista, Windows

Follow the 5 Simple Steps Below to Recover Deleted Photos using Acebyte Utilities Undelete


Deleted photo recovery step 1: Open “Undelete”
Run Acebyte Utilities, choose “Utilities Box” > “Repair” > “Undelete”:
undete deleted photos utility free download
Deleted photo recovery step 2: Choose the disk which you need to recover images, and click “Scan”.
scan deleted photos from disk
Deleted photo recovery step 3: When the scan completes, you will find all the scanning results where your deleted photos will be listed.
choose the folder where the recovered photos will save
Deleted photo recovery step 4: Choose the specific files in the list and click “Restore” to choose the location where you want to save your recovery photo files..
recover deleted photos by this best data recovery software
Deleted photo recovery step 5: Few seconds later, your deleted photos will be undeleted successfully. You can find the recovery photo file in the place you chosen in step 4.

2012/07/12

How to clip videos and put movie clips to iPhone 4


Do you have an iPhone 4 on hand? What’s your felling about using it? Considering its remarkable screen, do you want to enjoy movie on it anytime anywhere? You may collect many great movies on your hard drive, but only want to keep the best scenes on iPhone 4 for better entertainment on the go. This article aims to show you how to cut out video clips from movies and put these movie clips into iPhone 4 by using BlazeVideo iPhone Video Converter, known as a professional alli-in-one tool for iPhone 4 fans.


Instructions on how to cut out loved video clips from a movie

Step 1 Load the source video movie into BlazeVideo iPhone Video Converter.

Free download BlazeVideo iPhone Video Converter, install it and run it. Click “Add video(s)” and choose to import your source video file.

Step 2 Clip videos from the source movie.

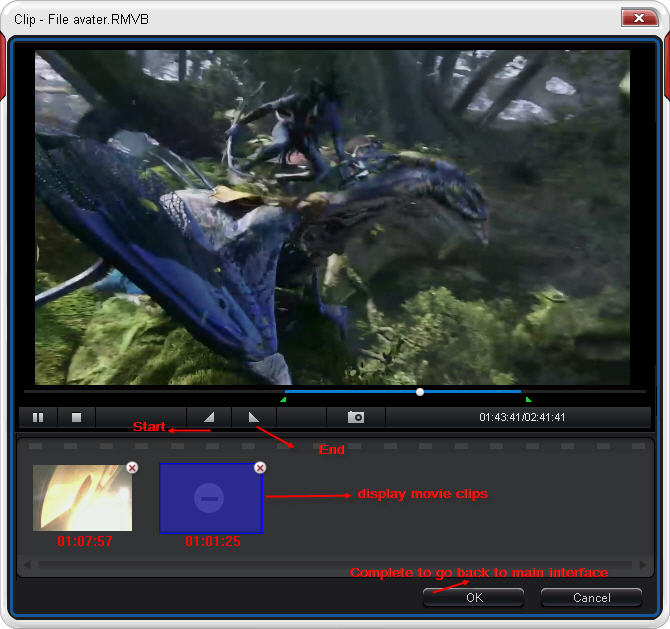
Click “Clip” button to come out the “Clip” box: cut out your loved scenes by clicking the Start and End buttons.
clip videos for iphone 4

Step 3 Put these video clips to iPhone 4 for playing.

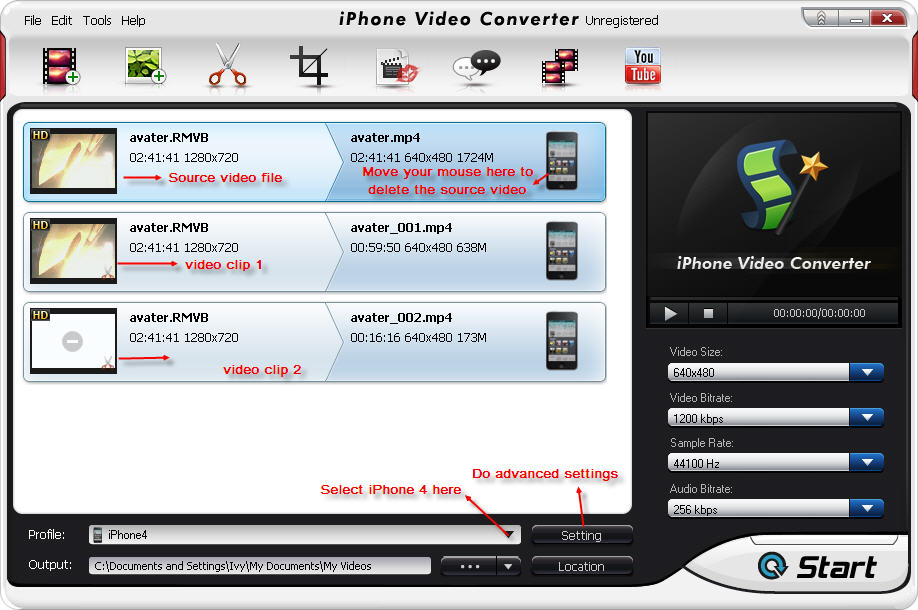
Drop down “Profile” to choose “iPhone 4” as output video format. Click “Start” to convert the selected video clips into MP4 for playback on iPhone 4.
Note: Usually, the source video file will be still on the BlazeVideo iPhone Video Converter. If you do not want to convert the source video to iPhone 4, please delete it from the task list as shown in picture below:
convert movie clips to iphone 4